Sunday, April 10, 2016

From Illustrator Artboard to Pixel Perfect Images in JavaFX

Pixel Perfect SVG Images in JavaFX

I've been using vector (SVG) images more and more to get that pixel perfect, crisp look to images incorporated throughout user interfaces.  JavaFX CSS provides a clean way to get SVG paths defined as a style that can be applied to any stlyleable node.  Here's a quick and simple example that compares the look of traditional raster and vector images used in a JavaFX user interface.

Let's start by using Adobe Illustrator to create a couple icons that we'll use in our interface.  Here we start by defining our space-icons document that has two artboards that are a custom width and height of 48px.  Notice that I have the Align New Objects to Pixel Grid since that enables the most accurate export of artboards to a fixed width and height (48px in this case).
Adobe Illustrator New Document Dialog for Custom Artboard Dimensions
I like to define my own smart guides that span multiple artboards to keep the shape distances and alignments consistent across a family of icons.  Notice that I'm 1200% zoomed into these artboards and the edges are all super clean and crisp, as expected from vector shapes.
Adobe Illustrator Space Icons Artboards
The process to get these shapes exported into raster and SVG formats is super easy.  We'll start by exporting into PNG format by clicking File -> Export... and then selecting PNG as the Save as type. Notice that the default export naming convention is the artboard number after the document name.  You can change that by naming each artboard,
Raster Images Exported from Adobe Illustrator
Now let's export the artboards as SVGs.  An important note is that we need the individual artboards exported as SVG Paths and not standard SVG that contains shape mark-up.  What do I mean?  Let's take a look at how the exported SVG appears by default from the first icon.  Click File -> Export... and select SVG as the Save as type.  Illustrator provides SVG options for export that I'm not going to cover in this post, so choose the default settings when prompted.  Use a text editor, such as Notpad++, to open the SVG file for the first artboard.  This is the SVG markup for the first icon:
<svg id="Layer_1" data-name="Layer 1" xmlns="http://www.w3.org/2000/svg" viewBox="0 0 48 48">
<title>space-icons</title>
<circle cx="24" cy="24" r="18"/>
<polygon points="7.4 4.5 6.4 4.2 5.5 4.9 5.5 3.8 4.5 3.3 5.5 2.9 5.8 1.8 6.5 2.7 7.6 2.6 7 3.5 7.4 4.5"/>
<polygon points="4.4 8.5 3.4 8.2 2.5 8.9 2.5 7.8 1.5 7.3 2.5 6.9 2.8 5.8 3.5 6.7 4.6 6.6 4 7.5 4.4 8.5"/>
<polygon points="11.4 7.5 10.4 7.2 9.5 7.9 9.5 6.8 8.5 6.3 9.5 5.9 9.8 4.8 10.5 5.7 11.6 5.6 11 6.5 11.4 7.5"/>
<polygon points="7.4 11.5 6.4 11.2 5.6 12 5.5 10.9 4.5 10.3 5.5 9.9 5.8 8.8 6.5 9.6 7.6 9.5 7 10.5 7.4 11.5"/>
<polygon points="5.4 16.5 4.4 16.2 3.5 16.9 3.5 15.8 2.5 15.3 3.5 14.9 3.8 13.8 4.5 14.7 5.6 14.6 5 15.5 5.4 16.5"/>
<polygon points="16.4 5.5 15.4 5.2 14.5 5.9 14.5 4.8 13.5 4.3 14.5 3.9 14.8 2.8 15.5 3.7 16.6 3.6 16 4.5 16.4 5.5"/>
<polygon points="3.4 3.5 2.4 3.2 1.5 3.9 1.5 2.8 0.5 2.3 1.5 1.9 1.8 0.8 2.5 1.7 3.6 1.6 3 2.5 3.4 3.5"/>
</svg>

JavaFX CSS provides a -fx-shape property that only accepts SVG paths.  That means we must combine our vector shapes into a compound path that will provide us with a single path when exported from Illustrator.  To do this, see this short video.
Our example CSS file looks like this:
.space-icon1-vector {
    -fx-shape: "M42,24A18,18,0,1,1,24,6,18,18,0,0,1,42,24ZM7,3.5l0.6-.9H6.5L5.8,1.8,5.5,2.9l-1,.4L5.5,3.8V4.9l0.8-.7L7.4,4.5Zm-3,4,0.6-.9H3.5L2.8,5.8,2.5,6.9l-1,.4L2.5,7.8V8.9l0.8-.7L4.4,8.5Zm7-1,0.6-.9H10.5L9.8,4.8,9.5,5.9l-1,.4L9.5,6.8V7.9l0.8-.7,1.1,0.3Zm-4,4,0.6-.9H6.5L5.8,8.8,5.5,9.9l-1,.4,1,0.5V12l0.8-.7,1.1,0.3Zm-2,5,0.6-.9H4.5l-0.7-.8L3.5,14.9l-1,.4,0.9,0.6v1.1l0.8-.7,1.1,0.3Zm11-11,0.6-.9H15.5l-0.7-.8L14.5,3.9l-1,.4,0.9,0.6V5.9l0.8-.7,1.1,0.3ZM3,2.5l0.6-.9H2.5L1.8,0.8,1.5,1.9l-1,.4L1.5,2.8V3.9l0.8-.7L3.4,3.5Z";
    -fx-scale-shape:true;  
    -fx-background-color:black;
}

.space-icon1-raster {
-fx-background-image:url("space-icons-01.png");
    -fx-background-repeat:no-repeat;
}

.space-icon1-raster-200 {
-fx-background-image:url("space-icons-01.png");
    -fx-background-repeat:no-repeat;
-fx-background-size: 200 200; 

}

Notice that our compound path is the value of our .space-icon1-vector style.  The style includes a property that allows the vector image to scale with its contain size (-fx-scale-shape:true) and notice that by default our vector image is transparent.  The -fx-background-color:black property provides our shape's fill color.  And we've seen this comparison between raster and vector images a million times where we have a clear cut delineation between using bitmaps vs. vectors:
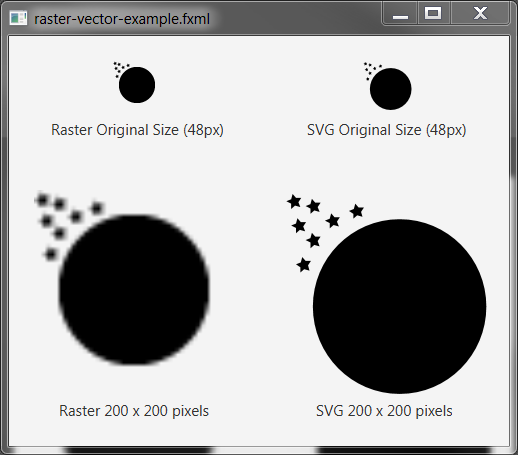
Raster (bitmap) vs. SVG (vector) Images at Original and 200px Sizes
One last point is that even though we have a clear winner for the most crisp image appearance, we must be aware of the subtle blurring in the JavaFX 2D canvas when we display SVGs in a node where Cache Shape and/or Center Shape properties are enabled.  If you notice that your SVG looks a bit fuzzy, try disabling the Cache and Center options in an FXML editor (such as Scene Builder) to instantly see any differences.
Scene Builder Node Properties for Cache Shape and Center Shape - Disable for Pixel Perfect Clarity


Monday, December 7, 2015

C# Web Project Testing and Debug Techniques

Several options are available for software testing and debug, but here we'll focus on unit testing with Visual Studio, integration testing with SoapUI and Selenium WebDriver, and debugging with Visual Studio and web browser developer tools.

Why Test?
Before I get started, the reason developers care about testing is because it helps minimize software defects throughout the entire software development life-cycle.  A couple things to note, however, is that software testing does not solve all our problems:  
  • Testing adds time to the development timeline because things like unit and integration tests don't write themselves, and
  • Tests will find the bugs in the tested conditions--but defects may still exist in promoted software.
Despite the caveats, software development should include testing to ensure the highest quality of code from start all the way through to future maintenance.  Software projects should start with clear goals for testing to ensure adequate test coverage within the project budget and timeline.

Types of Testing
Unit Test
Unit tests are software written to evaluate a given condition against the result of executing code to ensure a consistent and predictable outcome.  Unit tests are written to test the lowest level of functionality within a program.  As the word unit suggests, the test condition should focus on a small chunk of code that does a very specific task such as adding two numbers.  Shashank Tiwari wrote an article, Software Testing Types you Should Know About, that does a good job introducing the major types of testing.  Below is his illustration of how a unit test works.
Tiwari's logic diagram of how a unit test works
Integration Test
Integration tests are software written to evaluate a given condition against the expected result of multiple software components working together to form a single response.  As an example, an integration test may be written to check an employee web service method returns a specific employee name based on a given employee ID.  The illustration below describes how the integration test would look in this scenario.
Integration test example where the name John Doe is expected given an employee ID of 1

Test Tools
Several frameworks and applications are available for testing.  Here I'll cover unit testing in Visual Studio and integration testing with SmartBear's SoapUI, Chrome's Postman, and Selenium.
Unit Testing in Visual Studio
Unit testing in Visual Studio is pretty easy and is described in this great MSDN article.  Note that you can use several unit test frameworks such as NUnit; however, Microsoft's UnitTest framework is readily available and provides everything you need to get started.

Unit tests can be developed before authoring the application code in a process described as test driven development.  In this approach, the developer begins with writing unit tests and uses Visual Studio's automation tools to build-out the application code.  In my experience, the test driven approach promotes detail in application design and an improved focus on development.  This MSDN article describes a quick start example for a test driven Visual Studio solution.

Integration Testing with Smarbear's SoapUI

Automated Testing with Selenium